Shopify Integration

Shopify is a popular e-commerce platform. With our Shopify connector, you can connect to any number of Shopify stores and automatically import delivery orders from a Shopify website.
You can also pick which delivery method you want to take care of.
Connecting to a Shopify Store
1. Navigate to Configuration > Integration and scroll down to the “Shopify” section.
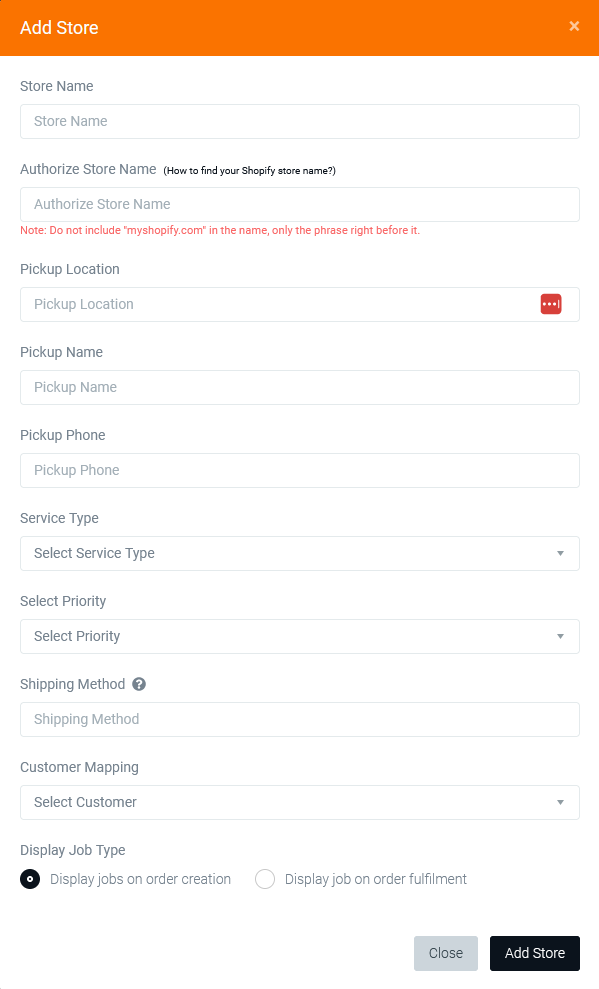
2. Click the “Add Store” button. You will see the following popup.

3. Fill out the required fields:
- Store Name – any name of the store that you will later recognise
- Authorized Store Name – a part of the Shopify Store URL – please see HERE on how to obtain it.
- Pickup Location – enter the postal address of the pickup point for all orders coming from this Shopify store.
- Pickup Phone – phone number of the store
- Service Type – select a service type that will be assigned to all jobs coming from this store
- Priority – select a priority that will be assigned to all jobs coming from this store
- Shipping Method – paste in the name of the shipping rate that you want to take care of. This needs to be provided by the Shopify store admin and it needs to be entered exactly as set up in Shopify. In order to receive all orders irrespective of the chosen shipping method, please leave the field empty.
- Customer Mapping – You need to select a customer within your Zoom Courier Software dashboard, that all jobs coming in from this store will be attributed to for billing. You will need to make sure that the customer account exists prior to connecting their store. You can create customers in the Customers section.
- Display Job Type – Select when you’d like Shopify orders to be imported – whether to import them as soon as orders are confirmed and paid by the consumer, or whether to wait for the Shopify store manager to mark orders as fulfilled.
- Click the SAVE button – You have now added a Shopify store to your Zoom Courier Software account.
- Next, we need to connect it to the actual Shopify store. This can be done by yourself or by your client in their Shoipify account.
- OPTION A – You have the correct Shopify login credentials or you are working with your client to set up the connection:
- Click the “Shopify” icon in the action column of the line with the newly added Shopify Store:

This will allow you to log in to the Shopify store and enable the connection.
- Click the “Shopify” icon in the action column of the line with the newly added Shopify Store:
- OPTION B – You ask your client to install the Zoom Courier Software Shopify APP which will take care of the connection.
- Click the “link” icon in the action column of the line with the newly added Shopify Store:

This will copy a link to your clipboard so you can paste it to your communication with the client – you need to send them the link and aske them to follow the instructions there to finalise the connection. - Once the client installs our Shopify App, they will be presented with a simple Thank You message, at which point, the connection is finalised:

- Click the “link” icon in the action column of the line with the newly added Shopify Store:
- OPTION A – You have the correct Shopify login credentials or you are working with your client to set up the connection:
Once the above is done, your Shopify connection should work and any new order with the selected shipping rate should be imported automatically. Always make sure that you test this by creating a test order in Shopify and verifying that it has been imported correctly. Then, cancel the order in Shopify to verify that it gets cancelled in your dashboard.

